
New to Basecamp 3? Check Out our Best Practices & Tips!
By Lisa Hirst Carnes | November 2021

New to Basecamp 3? Check out our Best Practices and Tips for Getting Started
In today's productivity-focused world, there is no shortage of project management software to prioritize tasks and keep projects on track.
Our team relies on Basecamp 3 for these needs, and with good reason. It offers an easy-to-use hierarchical structure that helps enhance our time, be inclusive of all team members, and wholly manage projects. If you're new to Basecamp 3, here's what you should know about it.
The Framework of Basecamp 3
One of the reasons why this software is so effective is because of how it is organized. When an individual logs in, the top-level navigation allows for a few different options. Below that, they will see a hierarchy of HQ, teams, and projects, from top to bottom. This allows them to decide what and whom they're interacting with while in the application. The top-level navigation includes:
- Home: This allows the individual user to return to the home screen/dashboard hierarchy where they can see HQ, teams, and projects.
- Pings: This is for direct messaging with other users within the Basecamp HQ, and it is not specifically tied to teams or projects. We don’t recommend using Pings for this reason.
- Hey!: This is for any and all notifications tied to your account presence, so it may be relative to all levels of the hierarchy.
- Activity: This allows you to see all activity associated with your account.
- My Stuff: This is a dropdown menu with multiple options, such as "My Assignments", and "My Schedule." It also includes recently visited pages.
- Find: This is a standard search bar to find things. It also allows you to narrow down your search terms for better, quicker results.
While the top-level navigation is vital once you're familiar with the Basecamp framework, it's important to understand the different levels of the hierarchy.
Company HQ: This is the proverbial "base camp" for your organization, where all your employees come together. All employees are part of the HQ, and it can be used for anything from making announcements to storing documents. Essentially, it's a perfect place to manage day-to-day operations or administrative tasks that don't deal with specific accounts or projects. For individual users, they can interact with the company HQ on a personal level, without actually posting or sharing things with the larger group.
Teams: Here, you can start to break the larger group into smaller team entities, such as Marketing, Operations, Sales, etc. This level allows for the same actions as the HQ level, such as creating to-dos, scheduling, creating automatic check-ins, and sharing documents. This is a great way to ensure that your team can see what's going on with each other, and also interact with necessary tasks and items.
Projects: Once again, the projects layer allows you to execute the same actions, while also assigning items to specific members of the project group. It also allows you to add the client to the project for the sake of transparency and organization. This is where some tools become particularly powerful, such as the ability to schedule key dates, set automatic reminders, and view tasks that you've created or need to complete. If you’re an ArcStone client, this is where you’ll spend the majority of your time.
Once you are familiar with this framework, you can really jump in and get started.
Best Practices for Basecamp 3 Use
While the software is fantastic and easy to navigate, there are a number of ways to get the software to really work for you. Here are some of the best practices that we've come across when using Basecamp 3.
- Messages in Basecamp 3 are one of the core features. When you’re creating a message, be sure to tag the individuals you’d like to receive the message. If no one is tagged, team members will only see the message if they actively go to Basecamp 3 and look in the messages area.
- Steer clear of tagging everyone on your message. This can quickly result in a clogged inbox.
- Stick to the topic. If a message is about a specific topic, don’t introduce a whole new topic on that same thread. Instead, start a new message with a relevant title.
- Similar to Messages, when you create todos, assign a team member to the todo.
New Basecamp Updates
Repeating to-dos
Basecamp has finally added Repeating to-dos. It's easy to create a repeating to-do. Simply look for the new block called "Repeat" as you're setting up a new to-do. Once it's set up, it'll get a little green repeating icon next to it so you know it repeats.

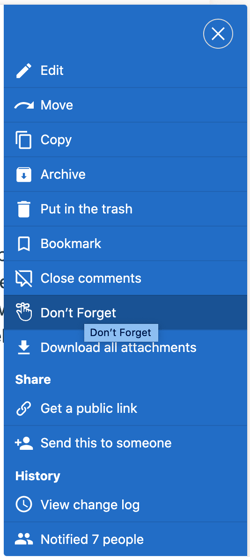
Don't Forget
We've all forgotten to follow up on a notification. It happens. Fortunately, Basecamp just rolled out "Don't Forget" as an option. Once selected, it'll stay there so you always see it. Simply hit "x" when you're done.
To use Don't Forget feature go to that item, click the ••• menu, and select "Don't Forget".
Closing Threads
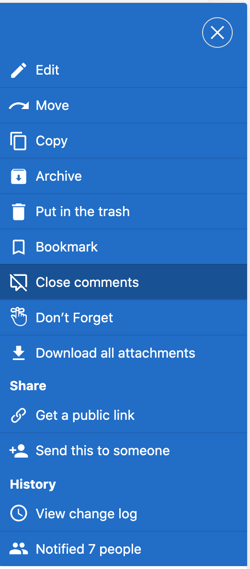
This is my favorite. Sometimes Basecamp threads go on and on and on. When Closing Threads is selected, all previous comments and discussions will be still displayed but a "Comments are closed" notice will replace the comment box so no new comments can be added.
To close comments in any specific thread on any message, document, file, to-do item, etc., go to that item, click the ••• menu, and select "Close comments".
We are thrilled to be working with you! Need more assistance or have more questions about how to use Basecamp 3? Reach out to our team, and we will help get you started.
Topics: Tips and Tricks


Our Values
- Service
- Craftsmanship
- Evolution
- Harmony
- Happiness


From Our Blog
Stay in Touch
2801 Hennepin Avenue South, #601Minneapolis, MN 55408